We are showcasing Spellbinders Products this week. If you have any of these products, we’d love to see them used, but it’s certainly not a requirement to join the challenge.
As always, the generous folks at Simon Says Stamp will be giving away a $25 voucher to one randomly selected winner to shop at the fabulous Simon Says Stamp Store. You can enter 5 times which means you can make 5 different projects following this week’s prompt and have 5 chances to win a shopping spree!! Sounds like a win/win to me!! I’ve linked all of the supplies that I used at the end of this post. Compensated affiliate links used where possible at no cost to you.
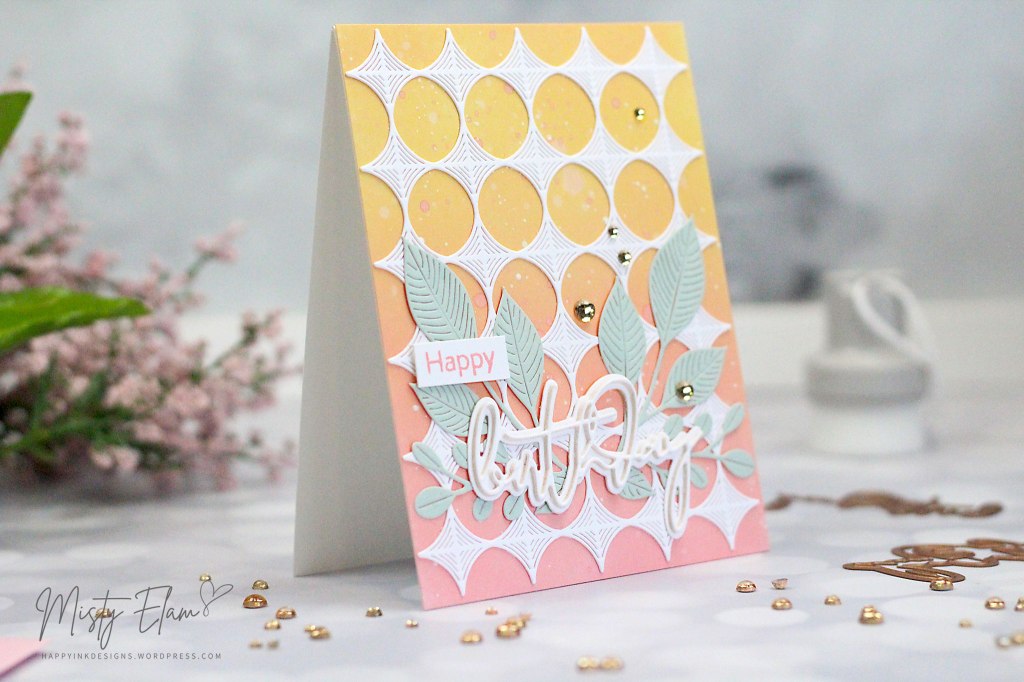
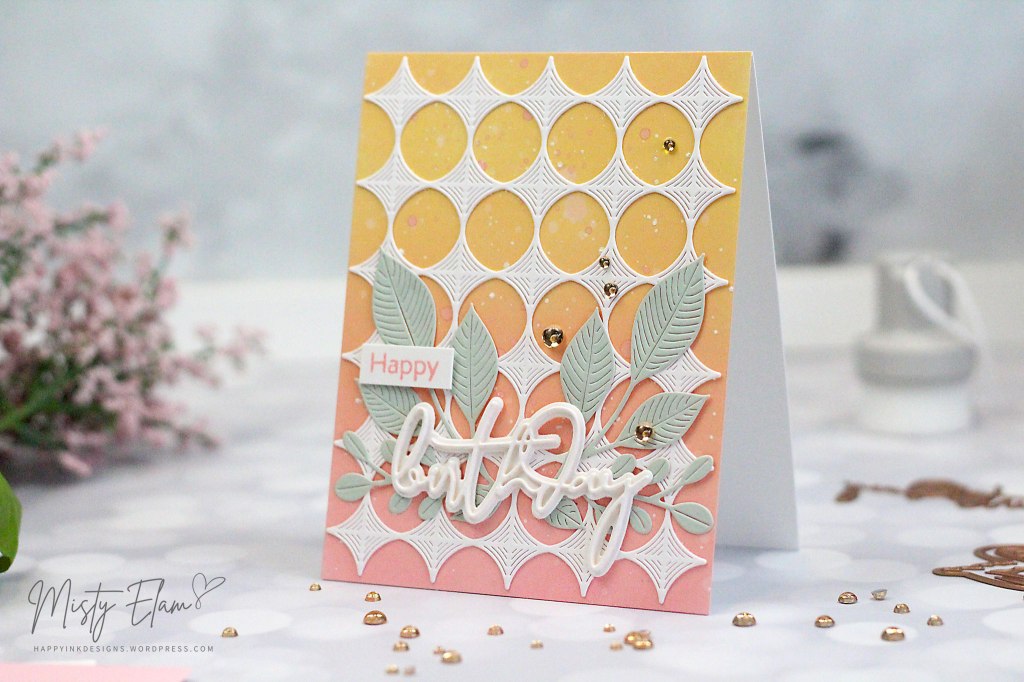
To layer over the top of my ink blended background, I die cut the Whirl Diamond Plate die out of white card stock and I love how beautiful it looks against my background.
I die cut the Grand Corner Leaves die using this lovely paper pack by Echo Park called Our Baby Girl to give my sentiment it’s own backdrop and then I moved onto the sentiment.
I stamped the Happy on a scrap piece of white card stock using the Saltwater Taffy D.O. ink and I trimmed it down to the size I wanted. The Birthday die is from Spellbinders and it’s called Yana’s Layered Script Sentiments die. I LOVE these dies. It comes with a “Happy” and a “Thanks” scripty die as well, plus they each have a shadow die. And they do layer quite nicely. I kept the “Birthday” sentiment in white. It really was the best option.
To finish off my card, I added a few Champagne Clear Drops and it was exactly what my card needed.
We are showcasing Paper Rose Products this week. If you have any of these products, we’d love to see them used, but it’s certainly not a requirement to join the challenge.
As always, the generous folks at Simon Says Stamp will be giving away a $25 voucher to one randomly selected winner to shop at the fabulous Simon Says Stamp Store. You can enter 5 times which means you can make 5 different projects following this week’s prompt and have 5 chances to win a shopping spree!! Sounds like a win/win to me!! I’ve linked all of the supplies that I used at the end of this post. Compensated affiliate links used where possible at no cost to you.
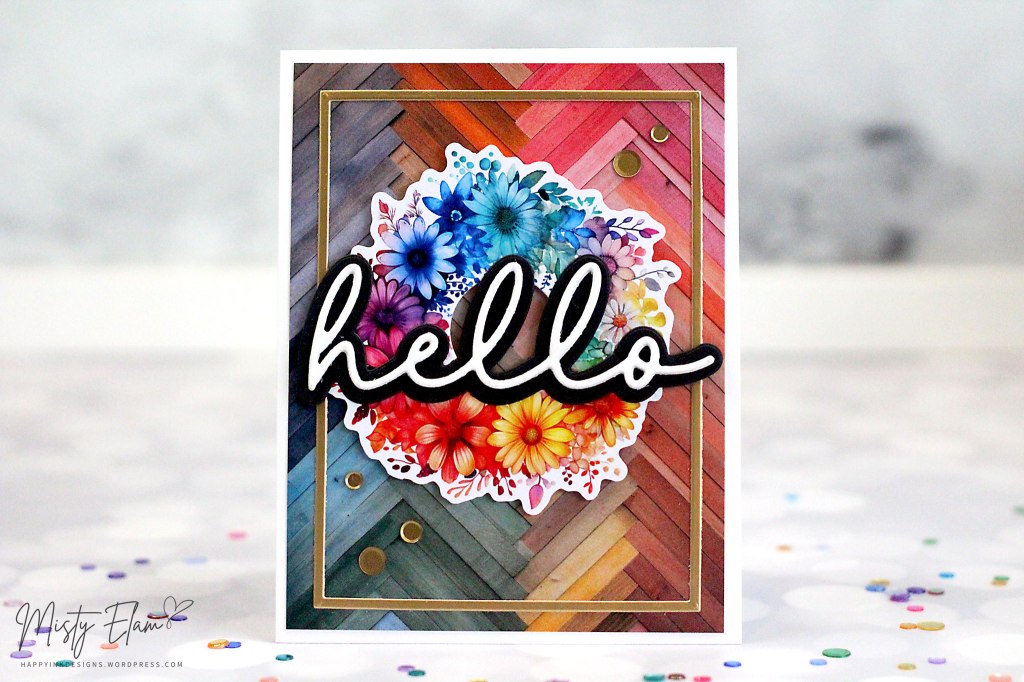
The products I used to make these two cards made it sooooo easy and quick to pull these together. The “Beautiful Blooms” are from Paper Rose and they’re called Rainbow Twirl 2.0 Die Cuts.
I’ve never used pop out die cuts like this before and they were just so beautiful that I thought this was the perfect opportunity to give them a try!
The package includes 4 A5 sheets of pop out dies so there are many to choose from. Twenty six to be exact, I counted. But they’re all in these gorgeous rainbow colors. Some are wreaths, some are circle (like my 2nd card) and there are even a few heart shaped cut outs.
I popped out the floral die cut and used a small circle die to cut out the center. I paired this gorgeous bouquet with some patterned paper also by Paper Rose called Rainbow Wood. These two products go very well together. I trimmed the patterned paper down to 4″ x 5.25″ so that I would have a slight white border going all the way around.
I used the Simple Hello die from CZ Design for my sentiment. I die cut 3 layers of the smaller die and glued them together to add some dimension to my card. I cut the shadow die out of Black Card Stock and adhered that to the smaller die. That wasn’t enough dimension for me so I also popped the bouquet up with some Foam Squares.
To finish this card off, I added a gold frame using 2 of the A2 Layers Dies from Waffle Flower and I matched that with a couple Satin Gold Sequins. Popped everything onto a top folding card base and card #1 was complete. I think it took me about half hour to make this card.
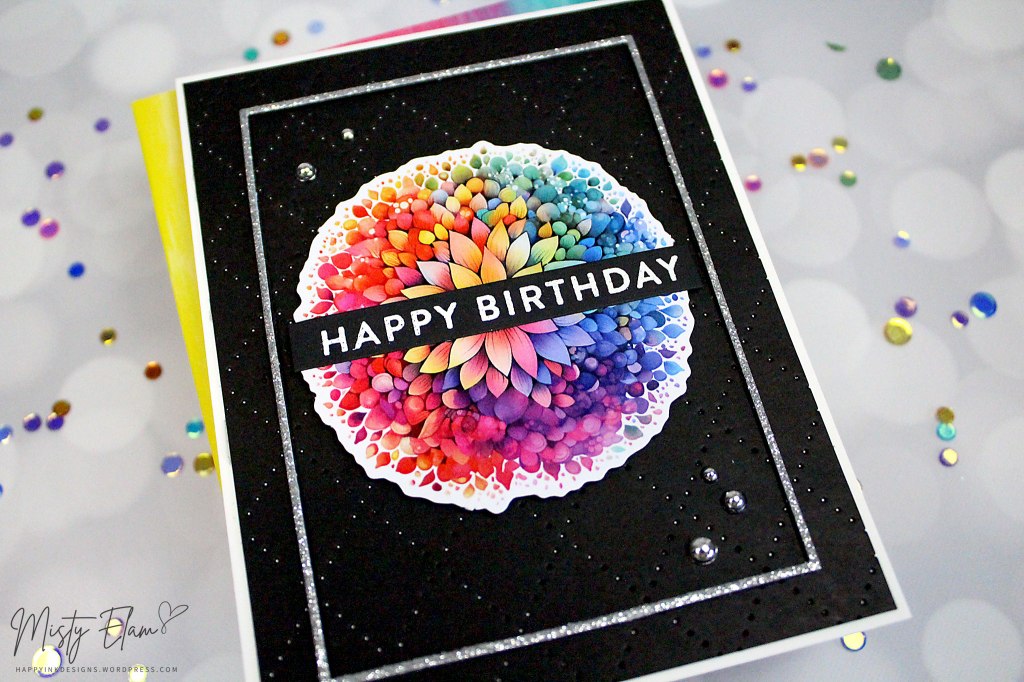
Now, for my 2nd card I used one of the circle pop out die cuts. The colors are just so vibrant, I love it!
Let’s start off with the background. I used this gorgeous Pierced Blanket Cover Plate Die by Picket Fence and I die cut it using Black Card Stock. I trimmed this down a bit to give me a white border.
I attached the background to a top folding card base and then added the floral circle. I used foam squares again to pop the bouquet up some. I had a Happy Birthday strip that I heat embossed awhile back in my stash and I can’t for the life of me remember which stamp set it came from. It’s one of those things that are going to drive me nuts until I figure it out though. I glued my sentiment across the front of the bouquet.
I liked the gold trim from my previous card so much that I decided to do it again for this card. Except I wanted it to be thinner so I used the Frames die from Simon with some silver glitter card stock. I die cut this out 2 additional times with white card stock to pop it up and make it look more like a frame.
We are showcasing Gina K Designs Products this week. If you have any of these products, we’d love to see them used, but it’s certainly not a requirement to join the challenge.
As always, the generous folks at Simon Says Stamp will be giving away a $25 voucher to one randomly selected winner to shop at the fabulous Simon Says Stamp Store. You can enter 5 times which means you can make 5 different projects following this week’s prompt and have 5 chances to win a shopping spree!! Sounds like a win/win to me!! I’ve linked all of the supplies that I used at the end of this post. Compensated affiliate links used where possible at no cost to you.
And fun I certainly did have!! I was having so much fun that I ended up making 5 cards with all of my gorgeous foiled backgrounds.
For all of my cards this week I used a couple new (to me) products. I used Gina K Designs Tiny Hearts Poly-Glaze Foiling Sheets for all 5 cards. Up until now, the only way I knew how to get a foiled image was to use a toner sheet. Toner sheets are great, but I noticed I would always end up with black spots in my foiling. It was kind of a distressed look, I guess. What I like about these is the background is white but also there was no missing foil throughout my panels.
It turned out so beautifully that I tried my luck and foiling an entire sheet. For this, I used Gina K’s White Poly-Glaze Sheets. These come in 8.5″ x 5.5″ sheets. I found it easier to just cut these in half and foil 2 A2 sized panels. They fit in my transfer folder better. So it basically just looks like a half sheet of white card stock but it foiled flawlessly!! The entire panel!! As you can see above, no bald spots!! I ended up making several Tiny Hearts panels and several solid foil panels because I was just having way too much fun.
I used one of the solid panels that I foiled for my background here. This is Enchanted Rose and it is my favorite!! I just couldn’t get enough of this color. I trimmed my tiny hearts panel down using a Stitched Rectangle die so that more of that foiled panel would shine through. Since the white poly-glaze sheets make 2 A2 sized panels when cut in have, I used the 2nd panel to cut my sentiment. Again, no holidays (it’s what my Dad calls a missed spot when painting. I think it applies here too). I used the Hugs & Kisses die by Simon Says Stamp and I die cut an additional 2 or 3 layers so my sentiment would have some dimension. This die includes a shadow die so I cut the shadow die using SSS Vellum. My sub sentiment is from the Reverse Lucky Sentiment Strips. I popped my tiny hearts panel up with some craft foam and to finish this card off, I added a cute little heart and arrow at the bottom.
I pretty much did the same thing with this card except instead of a foiled background, I used an A2 panel of Gina K’s Plum Punch Card Stock.
I used top folding card bases for all 5 of my cards this week.
Check out that shine!! I just can’t get enough of this color and that shine. I didn’t add any embellishments because I just didn’t think they needed any.
Once again, I cut my tiny hearts panel with a Stitched Rectangle die and I cut a few additional layers for the sentiment so it would pop up a bit from my card. The schoolhouse red card stock matches really well with that red deco foil.
I couldn’t stop at just silver and red for my tiny hearts, I had to do a gold panel as well. I used Therm O Web/Gina K 14 Carat Fancy Foil for my tiny hearts background. I didn’t want my background panel to be so shiny so instead of making my own with the foil, I used a piece of Tonic’s Honey Gold Mirror card in Satin. It has a really nice matte look to it and it was just what I needed.
I used some Gold Glitter card stock for my love bulb along with some of the red foil panel for the heart and also for the shadow die of my sentiment. The sentiment is from CZ Design and it’s simply called Love You. I cut the smaller of the two dies 3 times to add dimension and the shadow die I cut using my red foiled panel.
Aaaand, just to throw a wrench in the mix, I decided to make a thank you card as well.
We are showcasing our very own Simon Says Stamp Products this week. If you have any of these products, we’d love to see them used, but it’s certainly not a requirement to join the challenge.
As always, the generous folks at Simon Says Stamp will be giving away a $25 voucher to one randomly selected winner to shop at the fabulous Simon Says Stamp Store. You can enter 5 times which means you can make 5 different projects following this week’s prompt and have 5 chances to win a shopping spree!! Sounds like a win/win to me!! I’ve linked all of the supplies that I used at the end of this post. Compensated affiliate links used where possible at no cost to you.
I made two cards for this challenge. One for my hubby for Valentine’s Day and one to give to someone else. Who is also loved.